Getting the box dimensions right is more important than most people think. Whether you’re shipping products, designing custom packaging, or calculating shipping costs, accurate measurements help you avoid wasted space, product damage, and unnecessary expenses.
Many people get confused between length, width, and height. Others measure the outside instead of the inside. Even small mistakes can lead to higher shipping fees or poorly fitting packaging. That’s why understanding how to measure a box correctly is essential for businesses, e-commerce sellers, and anyone working with packaging.
In this complete guide, you’ll learn how to measure a box step-by-step, understand the correct order of dimensions, calculate volume, and avoid common mistakes. By the end, you’ll know exactly how to measure any box accurately and choose the right packaging every time.
Note: Must read the full article, then you will never make mistakes, and you will never face losses. It is important to read the complete guide.
Why Box Measurements Matter in Packaging and Shipping
Accurate box measurements are the foundation of effective packaging. A few inches too large can increase shipping costs. A few inches too small can damage your product. Getting the dimensions right helps you avoid both problems.
For businesses, correct measurements improve product protection and reduce material waste. A properly sized box keeps items secure during transit and prevents unnecessary movement inside the package.
Box dimensions also directly impact shipping costs. Most carriers calculate pricing based on box size, not just weight. Larger boxes often mean higher dimensional weight and increased expenses.
Accurate measurements also improve branding and presentation. Custom-fit packaging creates a professional look and enhances the unboxing experience for customers.
Whether you’re shipping products, designing custom boxes, or ordering packaging, knowing the exact dimensions helps you make smarter decisions. Next, let’s break down the three key dimensions every box has: length, width, and height.
Understanding Length, Width, and Height of a Box
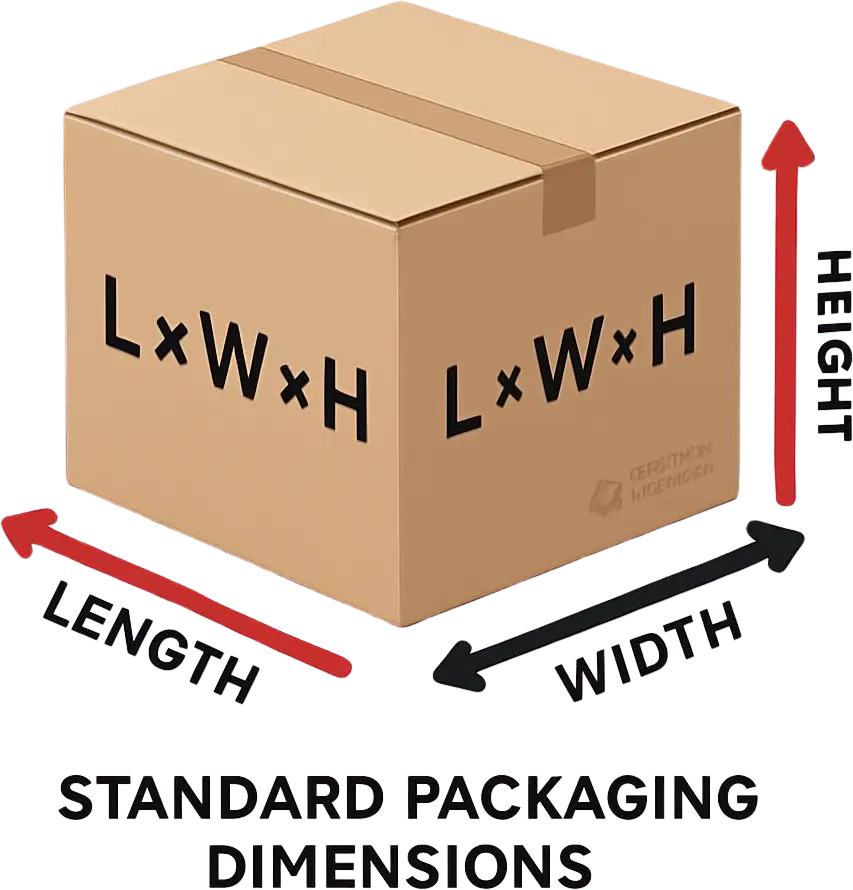
Every box has three basic dimensions: length, width, and height. Understanding these is the first step to measuring a box correctly. Many packaging mistakes happen simply because these dimensions are misunderstood.
Length is the longest side of the box when looking at the top opening. It usually runs from left to right. This is always measured first.
Width is the shorter side of the box, measured from front to back. Some people also call this depth. Width is always measured after length.
Height is the vertical distance from the bottom to the top of the box. This shows how tall the box is when standing upright.
These three measurements form a 3D dimension. Unlike 2D measurements that only include length and width, boxes require all three dimensions to define their size properly.
It’s also important to understand that length is always the longest side. Width is the shorter side. Height is always vertical. Keeping this rule in mind helps avoid confusion when measuring.
Step-by-Step Guide to Measuring a Box Correctly
Measuring a box is simple when you follow the right steps. Using a consistent method ensures accurate dimensions every time.
Step 1: Gather the Right Tools
Use a measuring tape, ruler, or scale. A measuring tape works best for most boxes. Make sure the box is fully assembled before measuring.
Step 2: Measure the Length
Place the box in front of you with the opening facing up. Measure the longest side from left to right. This is the length. Always measure this first.
Step 3: Measure the Width
Now measure the shorter side from front to back. This is the width. It is always measured after length.
Step 4: Measure the Height
Measure from the bottom of the box to the top. This vertical measurement is the height.
Step 5: Write Dimensions in the Correct Format
Always write measurements in this order:
Length × Width × Height (L × W × H)
For example:
10″ × 8″ × 4″
Following these steps ensures accuracy and consistency. But there’s one more important factor to consider — whether to measure inside or outside the box. That’s what we’ll cover next.
Once you understand these three dimensions, measuring a box becomes simple. In the next section, you’ll learn the step-by-step method to measure a box accurately.
Internal vs External Box Dimensions
One of the most common mistakes is measuring the outside of a box instead of the inside. This small error can lead to poor product fit and higher shipping costs.
Internal dimensions refer to the space inside the box. These measurements determine whether your product will fit properly. Packaging manufacturers and suppliers usually ask for internal dimensions.
External dimensions measure the outer size of the box. These are useful for shipping, storage, and logistics. Shipping carriers often use external dimensions to calculate rates.
Box thickness also affects measurements. Cardboard, corrugated material, and rigid boxes all have different wall thicknesses. This reduces the available space inside the box.
For custom packaging, internal dimensions are usually more important. They ensure your product fits securely and stays protected during shipping.
Understanding the difference helps you avoid costly mistakes. Next, let’s look at the correct order of box dimensions and why it matters.
Correct Order of Box Dimensions (L × W × H)
Using the correct order of box dimensions is just as important as measuring accurately. The standard format used in packaging is Length × Width × Height (L × W × H). This format is widely accepted by manufacturers, shipping companies, and packaging suppliers.
Length is always written first. It represents the longest side of the box.
Width comes second. It is the shorter side of the box.
Height is written last. It shows how tall the box is from bottom to top.
For example:
12″ × 9″ × 4″
Here, 12″ is length, 9″ is width, and 4″ is height.
Some people confuse height with depth. In many cases, height and depth are interchangeable. What matters most is staying consistent and clearly identifying each dimension.
Writing dimensions in the wrong order can lead to incorrect box production. This can cause product fit issues and packaging delays. Always confirm the dimension order before placing a packaging order.
Now that you know the correct format, the next step is understanding how to calculate the total box size using volume.
How to Calculate Box Volume and Size
Once you know the length, width, and height, calculating box volume becomes simple. Volume tells you how much space is available inside the box. This helps in product fitting, packaging design, and shipping calculations.
The basic formula is:
Volume = Length × Width × Height
For example:
10″ × 8″ × 4″ = 320 cubic inches
This means the box has 320 cubic inches of internal space.
Calculating volume helps you compare different box sizes. It also helps reduce empty space inside packaging. Less empty space means better protection and lower shipping costs.
Volume is especially important for custom packaging. It ensures your product fits properly without using oversized boxes.
Now that you know how to calculate box size, you can get custom box prices in 30 seconds. Get a free quote now. Let’s look at how to measure different types of boxes and unique product shapes.
Measuring Different Types of Boxes and Shapes
Not all boxes are the same. Some are standard rectangles, while others have unique shapes. Knowing how to measure each type helps you choose the right packaging.
Measuring Standard Cardboard Boxes
Place the box on a flat surface. Measure length, width, and height using the standard method. This works for most shipping and product boxes.
Measuring Rigid or Custom Boxes
Rigid boxes often have thicker walls. Always measure the internal space carefully. This ensures your product fits without being too tight.
Measuring Odd-Shaped Products
Some products don’t fit perfectly inside square boxes. Measure the longest, widest, and tallest points of the product. Then add extra space for padding or inserts.
Measuring Round or Cylindrical Items
Measure the diameter of the round object. Then measure the height. Use these measurements to choose or design a suitable box
Different products require different measuring approaches. Choosing the right method prevents packaging errors and improves product protection.
Next, let’s understand how box size affects shipping costs through dimensional weight.
Dimensional Weight and Shipping Calculations
Dimensional weight (DIM weight) is how shipping carriers price packages based on size, not just actual weight. If your box is large but lightweight, you may still pay more.
Carriers like UPS, FedEx, and USPS use dimensional pricing to optimize space in transit.
What Is Dimensional Weight?
Dimensional weight reflects how much space your package takes up. Larger boxes cost more to ship, even if they are light.
Dimensional Weight Formula
Use this standard formula:
Dimensional Weight = (Length × Width × Height) ÷ DIM Factor
- Common DIM factor: 139 (varies by carrier)
- Always use external box dimensions
Example:
12″ × 10″ × 8″ ÷ 139 = 6.9 lbs (billed as 7 lbs)
Why It Matters
- Bigger boxes = higher shipping cost
- Empty space = wasted money
- Incorrect sizing = unnecessary charges
How Box Size Affects Shipping Costs
Even a slight increase in box size can raise your shipping tier. Oversized packaging leads to:
- Higher DIM weight
- Increased carrier fees
- Reduced profit margins
Pro Tip
Always choose the smallest box that fits your product safely. Use inserts instead of oversized boxes. Please read this article to know which is the best box for your brand: mailer box vs shipping box.
Getting dimensional weight right can save you significant costs. Next, let’s cover common mistakes that silently increase your packaging expenses.
Common Mistakes and Expert Tips for Accurate Measurements
Small errors in measurement can lead to big losses. Higher shipping costs, damaged products, and poor fit often come down to simple mistakes.
Common Measurement Mistakes
- Measuring the outside instead of the inside
- Mixing up length, width, and height
- Writing dimensions in the wrong order
- Ignoring box wall thickness
- Rounding numbers too early
- Measuring an unassembled box
Expert Tips for Accuracy
- Always measure the inside for product fit
- Use a measuring tape for precision
- Measure from the center of edges, not corners
- Keep units consistent (inches or cm)
- Double-check before ordering custom boxes
Things to Avoid
- Guessing dimensions
- Using oversized boxes “just to be safe”
- Skipping re-measurement for new products
- Assuming all boxes follow the same sizing
Accurate measurements save money and protect your product. In the next section, we’ll answer the most common questions to remove any remaining confusion.
Frequently Asked Questions About Box Measurements
Quick answers to common doubts. Clear your confusion and measure with confidence.
What is L × W × H?
It stands for Length × Width × Height.
This is the standard way to write box dimensions.
- Length = longest side
- Width = shorter side
- Height = vertical side
What is the correct dimension order?
Always follow: Length × Width × Height
Wrong order can lead to incorrect box production.
Stay consistent when ordering or shipping.
Should I measure inside or outside?
- Inside = for product fit
- Outside = for shipping and storage
For custom packaging, inside dimensions matter most.
How to measure unique shaped products?
Measure the maximum length, width, and height.
Add extra space for inserts or padding.
For round items:
- Measure diameter + height
How to calculate box volume?
Use this formula:
Volume = Length × Width × Height
Example:
10″ × 8″ × 4″ = 320 cubic inches
Helps you choose the right box size and reduce empty space.
Now you have all the answers. Go back and apply these steps to measure any box correctly and avoid costly mistakes. If you are looking for custom boxes, please get in touch with us to get started.